

今回は、コントローラとルーティングについて解説していくよ。

僕は、会社行ったらまずYahooニュースを見ますね。
ん?それはルーティーンのことかな?間違えてるし、ちゃんと仕事しなさい。
プロコアラ@エンジニアブロガー
10年間エンジニアをしており、副業でWebサイトやWebサービスを作っています。
一時期資格取得にハマりTOEIC860点オーバー、応用情報処理は取得。休日はラズパイをいじるコアラ好きです。
Follow @top_pro_koala
今回のチュートリアル概要
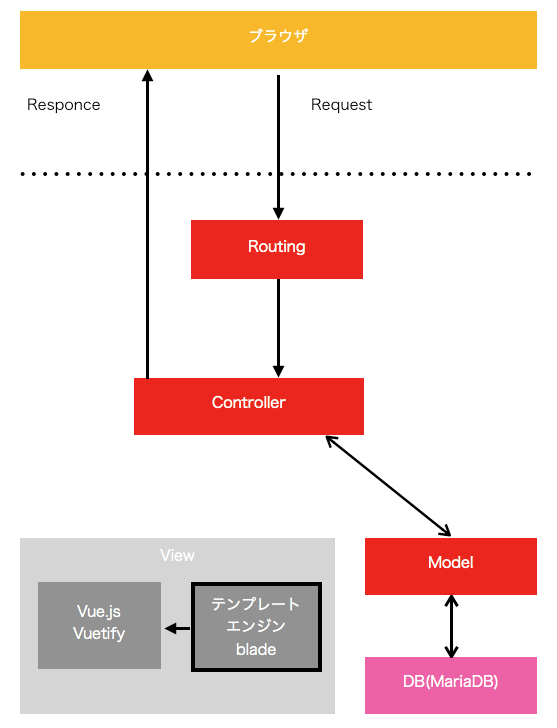
今回は、RoutingとControllerを中心に解説します。
前回、マイグレーションでデータベースを操作できるようになったため、データベースの情報を取得できるようにします。
今回は、Viewへは渡さずにControllerでレスポンスを返します。
Controllerの新規作成
Controllerをartisanで作成していきます。
-rまたは–resouceとすることでリソースコントローラーが生成できます。
データベースのCRUD操作にはリソースコントローラーが便利です。
後々追加するのも手間ですのでまとめてリソースコントローラーを作成しておきます。
vagrant@homestead:~/code$ php artisan make:controller TestController -r
Controller created successfully.
コントローラが生成されます。
CRUD操作用の関数が用意されているから、後は処理を追加するだけです。
<?php

namespace App\Http\Controllers;

use Illuminate\Http\Request;

class TestController extends Controller
{
    /**
     * Display a listing of the resource.
     *
     * @return \Illuminate\Http\Response
     */
    public function index()
    {
        //
    }

    /**
     * Show the form for creating a new resource.
     *
     * @return \Illuminate\Http\Response
     */
    public function create()
    {
        //
    }

    /**
     * Store a newly created resource in storage.
     *
     * @param  \Illuminate\Http\Request  $request
     * @return \Illuminate\Http\Response
     */
    public function store(Request $request)
    {
        //
    }

    /**
     * Display the specified resource.
     *
     * @param  int  $id
     * @return \Illuminate\Http\Response
     */
    public function show($id)
    {
        //
    }

    /**
     * Show the form for editing the specified resource.
     *
     * @param  int  $id
     * @return \Illuminate\Http\Response
     */
    public function edit($id)
    {
        //
    }

    /**
     * Update the specified resource in storage.
     *
     * @param  \Illuminate\Http\Request  $request
     * @param  int  $id
     * @return \Illuminate\Http\Response
     */
    public function update(Request $request, $id)
    {
        //
    }

    /**
     * Remove the specified resource from storage.
     *
     * @param  int  $id
     * @return \Illuminate\Http\Response
     */
    public function destroy($id)
    {
        //
    }
}
Routingの設定
/testというアクセスが来たら、TestControllerというコントローラで制御するように設定しています。
routesディレクトリの下のweb.phpの最後に追加します。
Route::resource('test', 'TestController');
テストデータの作成
テーブルの中身を、確認のために作成しておきます。
MariaDB [homestead]> insert into tests set passed=14489, applicant='92108', examinee='65407',  test_day='20100418', test_name='平成22年度春期試験';
MariaDB [homestead]> insert into tests set passed=17129, applicant='100113', examinee='73242', test_day='20101017', test_name='平成22年度秋期試験';
とりあえず、2つのレコードを入力してみました。
MariaDB [homestead]> select * from tests;
+----+------------+------------+----------------------------+------------+-----------+----------+--------+
| id | created_at | updated_at | test_name                  | test_day   | applicant | examinee | passed |
+----+------------+------------+----------------------------+------------+-----------+----------+--------+
|  1 | NULL       | NULL       | 平成22年度春期試験         | 2010-04-18 |     92108 |    65407 |  14489 |
|  2 | NULL       | NULL       | 平成22年度秋期試験         | 2010-10-17 |    100113 |    73242 |  17129 |
+----+------------+------------+----------------------------+------------+-----------+----------+--------+
2 rows in set (0.001 sec)
Controllerの処理追加
コントローラで前回作成したModelのTestを指定します。
use App\Models\Testを追加してください。
index関数を以下のように修正して全レコードを取得して表示するようにします。
namespace App\Http\Controllers;

use Illuminate\Http\Request;
use App\Models\Test;

class TestController extends Controller
{
    /**
     * Display a listing of the resource.
     *
     * @return \Illuminate\Http\Response
     */
    public function index()
    {
        $tests = Test::all();
        return $tests;
    }
http://homestead.test/testにアクセスすると、以下のようなデータが取得できればOKです。
testをルーティングしてTestControllerに渡して、Modelでデータベースから取得した情報を返すことができました。
[{"id":1,"created_at":null,"updated_at":null,"test_name":"\u5e73\u621022\u5e74\u5ea6\u6625\u671f\u8a66\u9a13","test_day":"2010-04-18","applicant":92108,"examinee":65407,"passed":14489},
{"id":2,"created_at":null,"updated_at":null,"test_name":"\u5e73\u621022\u5e74\u5ea6\u79cb\u671f\u8a66\u9a13","test_day":"2010-10-17","applicant":100113,"examinee":73242,"passed":17129}]
こいつ…動くぞ!!
自分で作ったものが動くって楽しいよね。思わず往年の白い悪魔も飛び出るよね。
まとめ
とりあえず、データを取得して表示することができました。
データベースを使用した第一歩です。
次はこのデータをViewに渡して綺麗に表示してみましょう。
ではでは!