
今回はページにリンクを付けてページ遷移をしてみよう

はい、先生!お願いします!!
プロコアラ@エンジニアブロガー
10年間エンジニアをしており、副業でWebサイトやWebサービスを作っています。
一時期資格取得にハマりTOEIC860点オーバー、応用情報処理は取得。休日はラズパイをいじるコアラ好きです。
Follow @top_pro_koala
今回のチュートリアル概要
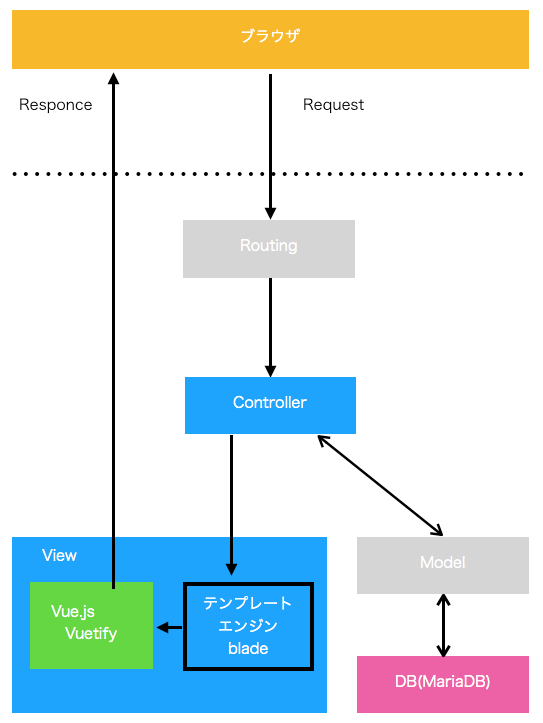
今回は、前回作ったテスト一覧ページにリンクを付けてテスト詳細ページに移動するところまで作成します。

Viewが中心のお話になります。

テスト一覧ページの修正
テスト一覧ページのリンクをクリックすると、個別のテスト詳細ページに移動するようにします。
前回使用したテスト一覧ページのTestComponent.vueを修正します。
<template>
    <div class="container">
        <v-layout>
            <v-flex>
                <v-card>
                    <v-card-title>
                        <h1>試験一覧</h1>
                    </v-card-title>
                    <v-card-text>
                        <p><a href="/">Home</a> >> テスト一覧</p>
                        <v-data-table
                         :headers="headers"
                         :items="tests"
                         class="elevations-1"
                         hide-actions
                        >
                            <template v-slot:items="props">
                                <tr>
                                    <td><a v-bind:href="props.item.id | add_path">{{props.item.test_name}}</a></td>
                                    <td>{{props.item.test_day}}</td>
                                    <td>{{props.item.applicant | number_format}}</td>
                                    <td>{{props.item.examinee | number_format}}</td>
                                    <td>{{props.item.passed | number_format}}</td>
                                    <td>{{props.item.examinee_rate}}</td>
                                    <td>{{props.item.passed_rate}}</td>
                                </tr>
                            </template>
                        </v-data-table>
                    </v-card-text>
                </v-card>
            </v-flex>
        </v-layout>
    </div>
</template>
<script>
export default {
    props: ["tests"],
    data: () => ({
        headers: [
            {text:'試験名', value:'test_name'},
            {text:'試験日', value:'test_day'},
            {text:'応募者', value:'applicant'},
            {text:'受験者', value:'examinee'},
            {text:'合格者', value:'passed'},
            {text:'受験率(%)', value:'examinee_rate'},
            {text:'合格率(%)', value:'passed_rate'},
        ]
    }),
    filters: {
        number_format(value) {
            if(!value) return '0'
            return value.toString().replace(/(\d)(?=(\d{3})+$)/g, '$1,')
        },
        add_path(value) {
            return "/test/" + value.toString()
        }
    },
}
</script>
今回はSEOを考慮してSPA(Single Page Application)では無くMPA(Multi Page Application)で作成するため、Vue.jsのroute-linkは使用しません。
MPAではaタグを使用してページの遷移を実現します。
aタグのhrefをv-bindにして変数と関連づけています。
props.item.idはデータベースの連番で採番されるIDが入ります。
その変数をフィルタ関数のadd_pathで/test/1、/test/2となるように修正しています。
MPAで動作させる情報が少なくてどこにも記載がなかったため、この方法がスタンダードなのかよく分かりません。
テスト詳細ページの作成
コントローラの修正
テスト詳細ページのコントローラTestController.phpはshow関数を修正します。
routerはすでに作成済みですので、/test/1のようにidが指定された場合にshow関数が実行されます。
    public function show($id)
    {
        $test = Test::find($id);
        $passed_rate = round($test['passed'] / $test['examinee'] * 100, 1);
        $examinee_rate = round($test['examinee'] / $test['applicant'] * 100, 1);
        $test['passed_rate'] = $passed_rate;
        $test['examinee_rate'] = $examinee_rate;
        return view('test.show', compact('test'));
    }
Test::findでデータベースから指定されたidのテスト情報を取得してきます。
テスト一覧同様に、受験率と合格率を計算ごにview側へ変数付きで渡しています。
indexとは異なり、testsではなくてtestを渡します。
Viewファイル show.blade.phpの新規作成
新規にresources/views/test/show.blade.phpを作成します。
index.blade.phpとほぼ同様です。
compactで取得したtest変数をv-bindでVueの子コンポーネントに渡します。
@extends('layouts.master')

@section('title', 'テスト詳細詳細')

@section('content')
  <test-show-component :test={{$test}}></test-show-component>
@endsection
Vueコンポーネントの新規作成
子コンポーネント TestShowComponent.vueを新規に作成します。
このコンポーネントもTestComponent.vueとほぼ同じものです。
<template>
    <div class="container">
        <v-layout>
            <v-flex>
                <v-card>
                    <v-card-title>
                        <h1>{{test.test_name}}</h1>
                    </v-card-title>
                    <v-card-text>
                        <p><a href="/">Home</a> >> <a href="/test">テスト一覧</a> >> {{test.test_name}}</p>
                        <h2>試験データ</h2>
                        <p>開催日:{{test.test_day}}</p>
                        <p>応募者数:{{test.applicant | number_format}}人</p>
                        <p>受験者数:{{test.examinee | number_format}}人</p>
                        <p>合格者数:{{test.passed | number_format}}人</p>
                        <p>受験率:{{test.examinee_rate}}%</p>
                        <p>合格率:{{test.passed_rate}}%</p>

                        <h2>午前問題</h2>

                        <h2>午後問題</h2>

                    </v-card-text>
                </v-card>
            </v-flex>
        </v-layout>
    </div>
</template>
<script>
export default {

    filters: {
        number_format(value) {
            if(!value) return '0'
            return value.toString().replace(/(\d)(?=(\d{3})+$)/g, '$1,')
        },
        add_path(value) {
            return "/test/" + value.toString()
        }
    },
}
</script>
app.jsの修正
TestShowComponentを登録するのを忘れないように行っておきましょう。
app.jsのtest-componentの下に以下のように追加しておきます。
Vue.component('test-component', require('./components/TestComponent.vue').default);
Vue.component('test-show-component', require('./components/TestShowComponent.vue').default);
テスト一覧のリンクをクリックすると以下の詳細ページにページ遷移できればOKです。
午前問題、午後問題は後日実装していきます。

まとめ
Vue.jsをMPAで使用する場合のページ遷移の方法を解説しました。
SPAで使用した場合、GoogleにはSEO上どのように認識されるか分からないためMPAで作成しています。
ここについては情報をウォッチしておきたいと思います。
次回は各テーブルのデータを作っていきたいと思います。
今回はここまで。ではでは!


